
A Guide To Use Our Online Packaging Design Tool
July 20, 2026 Packaging Design
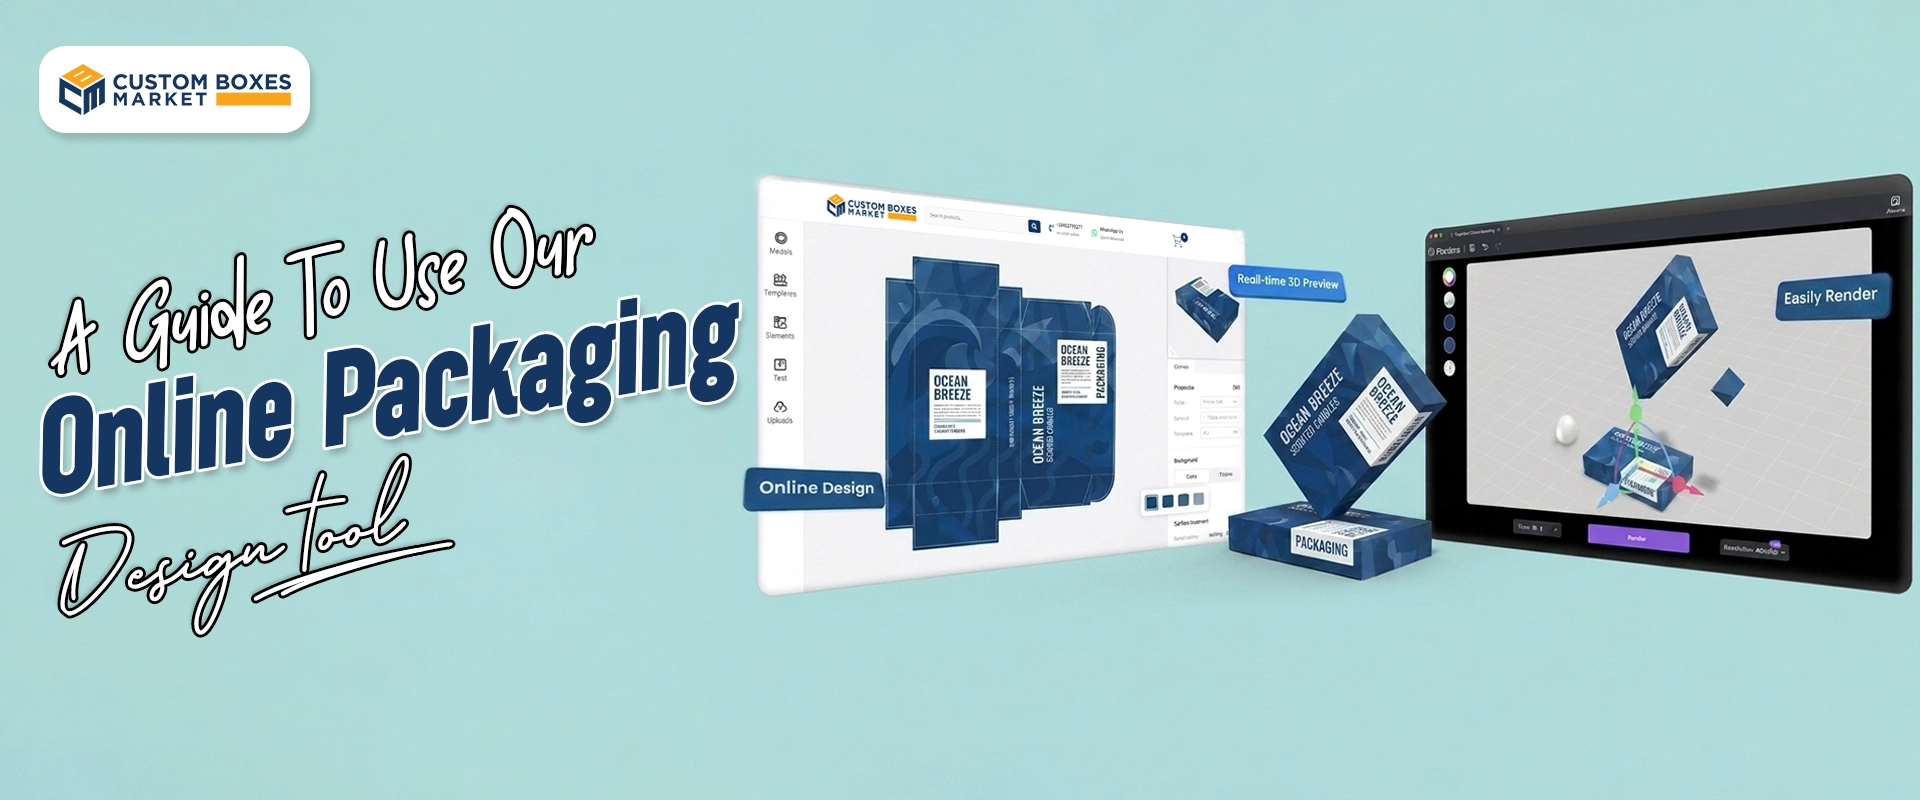
The creation of custom packaging is no longer difficult, as it does not require professional design software or graphic design experience. With our Online Packaging Design Tool, you can create or design ready packaging designs directly from your browser. Whether you are designing custom boxes, Mylar bags, product sleeves, labels, or retail packaging, the editor gives you complete control over every design element. You can also get a real-time 3D preview of your packaging design.
In this blog, we will explain every stage of the design process. From the selection of your product to the submission of your artwork for manufacturing. By the end of the blog, you will be able to create packaging that looks professional and prints accurately.
Why Use an Online Packaging Design Tool?
A traditional way of designing custom packaging involves multiple software programs. You have to learn file conversion, and repetitive communication with the designers is required. An online packaging editor simplifies the design process by allowing you to design directly on the packaging dieline. Our browser-based editor helps businesses:
- Design without installing software
- Upload existing artwork instantly
- Add logos, graphics, and text
- Generate QR codes
- Preview designs in 3D
- Position artwork accurately
- Submit production-ready files
- Reduce design revisions
Whether your brand is going to launch a new product or has to update an existing packaging, the tool will streamline the entire customization process.
Step 1: Open the Product Editor
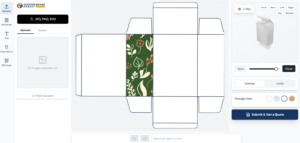
Start box design by selecting the packaging product you want to customize. After you have chosen your specifications, you can click on Design Online to launch the editor. The workspace opens with three primary sections and each section serves a specific purpose throughout the design process:
- Left Toolbar
- Central design canvas
- Right settings panel
Step 2: Understanding the Workspace Layout
Before you start designing, it is better to understand what each section controls.
Left Toolbar
This panel has all the creative tools used to build your packaging. Every design element you want to place onto the packaging starts from this panel. In the left toolbar, you will get:
- Upload artwork
- Add custom text
- Insert QR codes
- Add shapes
- Manage design elements
Center Design Canvas
The center area of the tool displays your packaging dieline. This is where you will position every design element. The flat packaging before folding and printing represents the dieline. Center design canvas allows you to:
- Select panels
- Move artwork
- Resize objects
- Rotate graphics
- Align elements
- Zoom in for precision
Right Properties Panel
Thai panels display the ding controls after you have selected an object. You can also see the interactive 3D packaging prereview from this. Based on the selected item, you can adjust the following:
- Width
- Height
- Position
- Rotation
- Scaling
- Appearance
Step 3:Understanding the Workspace Layout
Before you start designing, it is better to understand what each section controls.
Left Toolbar
This panel has all the creative tools used to build your packaging. Every design element you want to place onto the packaging starts from this panel. In the left toolbar, you will get:
- Upload artwork
- Add custom text
- Insert QR codes
- Add shapes
- Manage design elements
Center Design Canvas
The center area of the tool displays your packaging dieline. This is where you will position every design element. The flat packaging before folding and printing represents the dieline. Center design canvas allows you to:
- Select panels
- Move artwork
- Resize objects
- Rotate graphics
- Align elements
- Zoom in for precision
Right Properties Panel
Thai panels display the ding controls after you have selected an object. You can also see the interactive 3D packaging prereview from this. Based on the selected item, you can adjust the following:
- Width
- Height
- Position
- Rotation
- Scaling
- Appearance
Step 4: Add Custom Text
Packaging often includes the following text:
- Product names
- Ingredients
- Instructions
- Marketing messages
- Taglines
- Contact information
Select the Text tool. A text box appears on the canvas. Now you can customize the following:
- Font
- Size
- Alignment
- Position
- Rotation
Keep your typography readable and maintain sufficient space between the text and the fold lines for a cleaner look.
Step 5: Create and Add QR Codes
Modern packaging frequently includes QR codes for customer engagement. You can use the integrated QR Code Generator to quickly create scannable codes without leaving the editor. Simply enter the following:
- Website URL
- Product page
- Digital menu
- User guide
- Promotional campaign
- Social profile
Then you can resize the generated code and position it like any other design element. To ensure eligible scanning after printing, always leave adequate space around the QR codes.
Step 6: Add Shapes and Design Elements
Sometimes, simple graphic elements improve visual balance.
Simple graphics can also improve visual balance. The editor includes basic shapes to organize information. This information can involve:
- Rectangles
- Circles
- Lines
- Decorative elements
Shapes can be used for:
- Product highlights
- Background sections
- Icons
- Labels
- Callouts
The combination of shapes with text creates a cleaner information hierarchy.
Step 7: Arrange Multiple Design Elements
As your design grows, multiple objects may overlap. The editor allows you to reposition items until the layout looks balanced. You can create professional packaging that looks organized instead of cluttered. Commonly, the following design layers include:
- Background graphics
- Product images
- Logos
- Text
- QR codes
Step 8: Preview Your Packaging in 3D
One of the editor’s most valuable features is the live 3D preview. You do not have to imagine how the flat die line folds together, as you can preview the renders and the finished package in real time. It is better to rotate the package from multiple angles to verify that the artwork flows correctly across folds. This will reduce the production errors. You can inspect the following:
- Front panel
- Back panel
- Side panels
- Top closure
- Bottom closure
- Overall appearance
Step 9: Check Every Panel Carefully
Before submitting your design, review every printable area. Zoom into each panel individually. A few extra minutes of inspection can prevent costly reprints later. Review the following to avoid errors:
- Cropped logos
- Misaligned graphics
- Small text
- Incorrect placement
- Missing information
- Overlapping objects
Step 10: Save Your Progress
Complex packaging projects often require revisions. If the editor provides a save option, use it before closing your browser. By saving your artwork, you can continue editing later instead of starting over. This will also help you to create multiple design versions for comparison before making final decisions.
Step 11: Submit Your Design
Once you are satisfied with the layout, click Submit Your Design. A submission form will appear requesting basic information such as:
- Name
- Email address
- Phone number
- Additional notes
Provide any manufacturing instructions that can help the production team understand your project. After submission, the design is sent for review before production. Some examples are:
- Color preferences
- Special finishing
- Print concerns
- Artwork instructions
Best Practices for Better Packaging Designs
Even if you have the best design software, it can not replace good design principles. Follow the recommendations given below to get better results:
Keep Designs Simple
- Avoid too many colors, fonts, and graphics, as they can distract customers.
- Clean layouts generally communicate products more effectively.
Use High-Resolution Images
- Low-quality graphics often appear blurry when printed.
- Upload professional artwork whenever possible.
- Vector graphics provide the sharpest printing results.
Maintain Safe Margins
- Avoid placing important elements near cutting or folding lines.
- Keep logos, text, and QR codes comfortably inside the safe area.
Use Readable Fonts
- Decorative fonts may look attractive, but they can become difficult to read on small packaging.
- Choose fonts that remain clear at production size.
Check Color Accuracy
- Screen colors and printed colors may differ slightly.
- Using high-quality artwork and approved brand colors helps maintain consistency.
Test QR Codes
- Before design submission, scan every QR code with multiple smartphones.
- Confirm that each code directs users to the correct destination.
Common Mistakes to Avoid
Many first-time users make similar errors. Avoid these common issues in custom packaging in the best possible designs. You can save time and money if you correct the errors before production.
- Stretching logos disproportionately
- Using low-resolution images
- Overcrowding the layout
- Ignoring fold lines
- Placing text near trim edges
- Making QR codes too small
- Forgetting contact information
- Skipping the 3D preview
- Submitting without proofreading
- Using inconsistent fonts
Why Businesses Prefer Online Packaging Editors
Online packaging editors make the design of custom packaging easy for startups, e-commerce sellers, retailers, food brands, cosmetics companies, and manufacturers. The businesses will not have to exchange dozens of images with the designers as they
can visualize ideas instantly and submit production-ready artwork through a streamlined workflow.
Our design online tool has a combination of drag-and-drop editing, live previews, QR code generation, typography tools, and precise positioning controls. This makes it easier to produce packaging that reflects your brand while minimizing revisions.
Whether you’re ordering a single prototype or a large production run, our Online Packaging Design Tool gives you the flexibility to create professional packaging with confidence.
Start Designing Your Custom Packaging Today
You can get attractive packaging with the help of high-quality and perfectly aligned artwork. Our Online Packaging Design Tool gives you everything needed to build attractive, accurate, and production-ready packaging from your browser. Upload your artwork, customize every panel, preview the final package in 3D, and submit your design in just a few steps. Start designing today with Custom Boxes Market and bring your packaging ideas to life with speed, precision, and complete creative control.
Categories
Recent Posts

11 / September , 2026 Box Customization
27 / August , 2026 Custom Packaging
13 / August , 2026 Packaging Design
20 / July , 2026 Packaging Design
9 / June , 2026 Custom Packaging
4 / March , 2026 Packaging Design
19 / February , 2026 Box Customization
16 / February , 2026 Box Material
3 / February , 2026 Gift Boxes

26 / January , 2026 Gift Boxes
6 / January , 2026 Sustainable Packaging
3 / December , 2025 Packaging Stats